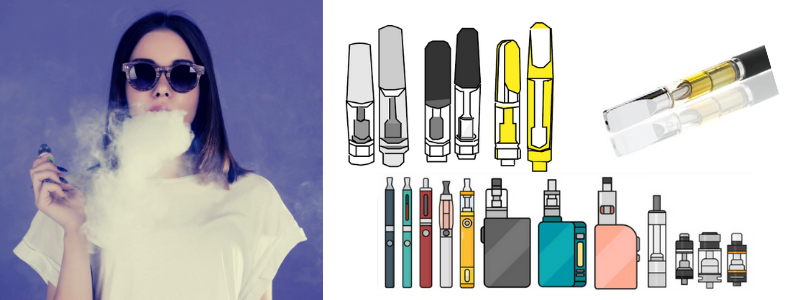
It can definitely be frustrating when you have a vape cartridge that just won't seem to work in your favorite vaporizer. The good news is that there are a number of ways you can troubleshoot these issues with fairly quick solutions. Rather than throwing your vaporizer out or opting to grab a new cartridge there are some quick troubleshooting tips that you can follow to fix a pen vape cartridge before you give up on it.
Troubleshooting the issue may mean going through a few different scenarios so that you can determine exactly why the vape cartridge is faulty. Some of the most common reasons that a vape pen may be faulty can include:
Make Sure you Wait after Inserting the Cartridge
A number of manufacturers have automatic timing settings for firing after a new cartridge is inserted. If the wick in the atomizer is not properly soaked in juice the device will not fire and that can prevent the chance that the atomizer could burn out. Many new manufacturers are including this safety feature because a burned-out atomizer can be a much more expensive replacement that a cartridge. Burning out awaken in atomizer can also be quite an unpleasant experience for a user too.
When you plug in a brand-new cartridge make sure that you are waiting at least 3-5 minutes before you try to fire the device. This will make sure that the wick is completely soaked in e juice before you proceed.
Compatibility with your Device
If you purchase replacement cartridges which are not from the same manufacturer or from a recommended manufacturer, you will continue to have issues with firing your vaporizer. You need to make sure that the cartridges you're using will allow you to get the optimal level of flavor and that they are designed for use with the atomizer that you have on your device. If you're using a cartridge that isn't designed for use with your device you could run the risk that you could burn out your atomizer or that the cartridge will never quite fast and well.
Battery Disconnect
If your battery is disconnected there's a good chance that your vaporizer will not fire. If the battery is pushed too far along the base of the cartridge you may have to screw the cartridge and battery together to make sure that they are properly tightened. This can often lead to an automatic shut off that can occur with the coil when the battery is close to shortening or not completely plugged in. When the link is severed between the heating element and the battery, you may just need to quickly jiggle the battery back into place so that the threads meet.
The other option is to completely unscrew the coil and battery and then screw it back in again. Completely unscrewing the threads will help to line up the battery appropriately. It can also fix up issues when the battery has been tightened too much. When the casing and the battery are tightened up too much this can often lead to a lawsuit in the link between the heating elements. When the circuitry gets pushed into deep this can ruin the flow of power between the battery and the heating coil. Make sure that the threads are only hand tightened and not tightened overly in the threads.
The easiest way to test and see if the battery is out of place is to test draw from the device. If the heating element doesn’t start but the airways seems open this could be an indication that the battery is simply too tight. If the airway appears to be closed in the heating element won’t start the whole device may have locked itself down because of the misalignment in the battery.
A really easy way that you can also make adjustments to the battery is with a small clip or a knife. If the threads won't go together or meet nicely, you can jam the clip or knife into the area around the element and try to pull the heating element upwards. Once you feel as though the device has been properly adjusted you can test out the draw again to see if the device will activate.
Proper Fastening of the Cartridge
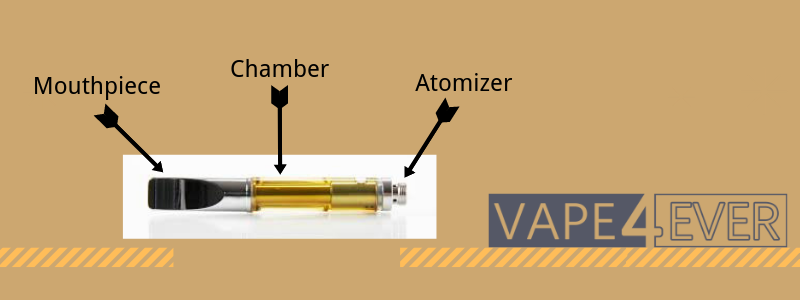
As well as making sure that the battery is properly fastened you'll also need to make sure that the cartridge inside your pen vape is also appropriately fastened into the device. Most pen vape cartridges are designed to slot into this slot into the device easily and thread in which the existing components. If there's some type of clasping mechanism or latch you will also need to make sure that this is appropriately secured before you fire the device. The capsule needs to be fitted according to manufacturer instructions and this means making sure that everything is properly fastened down before you activate the device. Activating the device before the capsule is appropriately fastened into it could risk the integrity of your vaporizer as there is a chance that it could short.
Outside Climate Issues
Vape cartridges and vaporizers themselves are not really designed to be exposed to high temperatures or inclement weather over a long period of time. If you are device is exposed to a particularly high temperature or you're out on a very hot and sunny day, this can often affect the cartridge. Cartridges can spoil in warm weather and this can also affect the overall functioning of the electronics in your device.
If you've ever experienced problems with an electronic device on a hot summer day, there's a good chance that a vape cartridge could provide you with the same level of grief when it gets too heated. One of the best ways that you can appropriately care for your cartridge is to keep it sheltered or even in a carrying case when you are planning on going out on a hot day.
Cartridges can also be affected when the weather is cold. When the temperature really starts to drop inside a vape cartridge there's always a chance that the oil inside can start to thicken. Lower temperatures will affect the way that the oil is pulled into the device and the way that the oil is heated. If your device detects an oil that is far too thick for the heating element it might actually shut off and this could be part of the reason why your cartridge is affected. The easiest way to fix up your cartridge is by leaving it in a plastic bag and heating it up in a couple of warm water over a few minutes. Make sure that the water does not directly impact or touch any of the electronics as this can spoil the cartridge forever.
Checking for Leaks in your Cartridge
In some rare instances cartridges can sometimes experience small leaks or broken seals. Depending on the way that your cartridges have been stored you might also experience a crack in the body of the cartridge as well. If you notice that the e juice inside seems to be discolored or the fill level inside your cartridge seems to be low there could be a whole or a leak in your cartridge. Some vaporizer manufacturers will not allow their devices to fire on if there is a low amount of juice in the cartridge. If this safety mechanism is in place you may never be able to fire on a cartridge that has been leaking or that has been faulty due to storage.
When the Cartridge Appears Blocked
Another common issue that can occur with vape cartridges comes when the device doesn't appear to be pulling breath in the right way. Checking in on the battery and making sure that it's properly charged can help you determine if there is a blockage in the cartridge or if there is simply a problem with the power functions of the device. If you've just changed the battery out you may also want to adjust your battery settings as using the wrong voltage could shut down the device until the right settings are met.
If the device still appears to be blocked or clogged you may want to consider the option of cleaning your cartridge to try and repair it.
Connectivity Issues
If you’ve purchased open cartridges or a bulk lot of cartridges that were packaged inappropriately there is a chance that some of the wires and connections could have gathered dust. Depending on the way that you store your vaporizer cartridges, the connections that are responsible for producing the powered vapor can have a lot to do with troubleshooting potential problems on the cartridge. Vape pen cartridges have wires that are exposed and they can be cleaned using a very simple set of steps.
First you'll need to unscrew the vape cartridge from the heating chamber. The wires can get exposed and from there you will have the ability to clean the area with the magnet or with isopropyl alcohol. With the exposed wires you can often use a clean Q-tip or cotton ball to data isopropyl alcohol along the area of the exposed wires. Alcohol should not affect the circuitry and it can remove any of the excess dust, wax or oil that could have built up along the connections which is impeding your progress. A small magnet could also be beneficial if there are a series of metal wire fragments from the inside of your device. Sometimes the connections in your devices can wear down over time and if the wiring is starting to wear away, a quick sweep over the wiring with the magnet can help to remove some of the shavings from the threads or wiring that could be blocking your connection.
Before any type of connectivity cleaning you will want to make sure that your vape pen is recommended for cleaning with water or alcohol. Some internal circuitry can be particularly sensitive to water so it's important to consider using a rubbing alcohol or electronics cleaner especially if you're vape pen is not deemed water resistant.
If you complete a cleaning on the cartridge and the connection still doesn't seem to be working that well, it may be wise for you to take a look at the coil on your vaporizer. Your cartridge could be in fine shape but the vaporizer coil could be what's faulty. In the case of coil replacement you may need to follow manufacturer instructions in order to get a replacement coil that is compatible with your device.
How to Appropriately Change of Vape Pen Cartridge?
Any vape pen cartridge needs to be changed out using appropriate manufacturer specifications. If you're placing the cartridge in your device for the first time or performing your first cartridge change there are a number of instructions that you'll need to follow in order to make sure that you don't burn out the atomizer in your device and so that you can make sure your device will fire on well. Some generic instructions that you can follow for changing up the cartridge on your vape pen include:
Make Sure Your Device Has a Full Charge
Most vape pens will require you to charge up the device and this requires a USB adapter. The onboard battery will often charge quickly and the recharging rate on most vape pens is usually fairly quick. To properly charge up your vape pen, find the port where the charger is an plug it into a power source to start charging up the device. Most vape pens will have an indicator light on the device that will show when it's completely charged. If you going to use the device for the first time make sure that it's completely charged up before you take your first draw or plug in a capsule.
Make Sure the Battery is Appropriately Connected
The battery and cartridge need to be connected to one another. This means screening cartridge into the battery slot and making sure that there isn't any just or blockage that could prevent the device from fully impacting the cartridge. As mentioned before, you can follow the threads in the manufacturer's specifications as you plug in the device and make sure that the device fully charges.
Wait to Turn the Device on
After changing out the new cartridge make sure that you wait at least 3 to 5 min. before you turn the device on. This will make sure that the wick on board will have time to soak up some of the e juice. If the wiki does not have the appropriate amount of time to soak up the juice, this can lead to a dry hit or the chance that you could burn up the coil completely.
Turn on the Device
After the appropriate amount of waiting time you can turn on the device. Most pen vapes turn on using a single power button that you'll have to click several times to heat the device.
Make Adjustments to Temperature
After the device begins to heat up, you can make adjustments on the temperature. This usually means pressing the power button a few times so that you can adjust the overall heating temperature of the e juice in the vape. If you read more into the cartridge and the flavor that you are using, you'll be able to determine the ideal heating temperature for each flavor you have.
.png)
Press or Inhale
To see if the cartridge draws correctly you can start the inhalation process by either taking a mouth draw if your vape has auto breath draw functions or using the press to inhale feature on your vaporizer. If it doesn't feel as though you can draw from the device, there could be a problem with the overall connection. Performing the battery unscrew action is one of the easiest ways to open the airway and enjoy an easier draw from the device.
If you can inhale from the device easily, take a short draw to begin with. This will give you an indication of the flavor profile and make sure that you don’t end up with an irritated throat or a burning sensation from drawing too fast. Taking a few small pots will also help you adjust the temperature so that you can enjoy the best level of flavor. It may be wise to take a slower draw each time you change up flavors were cartridge styles so that you can get used to the new format. Even if your cartridge is approved by your manufacturer, that doesn't mean that it won't draw differently than the last flavor or cartridge style that you used.
Cartridges with vaping remain one of the best ways that you can get started with a vaporizer. Many of them come prefilled and it's quite easy to just insert the cartridge and get vaping in just a few short moments. Most of the time with the prefilled formats you don't need to troubleshoot much at all and with just a few quick adjustments to your power you can be up and running with your vape. Cartridge formats also make sure that you can quickly reload and change up flavors on the fly.
If you are having any problems with your vape cartridge, remember to follow some of these top instructions to avoid any problems with your vape. If you're troubleshooting a series of issues with your vape, just keep some of these ideas in mind and you can work at solving them quickly!
Photo sources: pixabay.com, shutterstock.com, pexels.com, flickr.com, gettyimages.com, istockphoto.com, unsplash.com, freeimages.com, 500px.com, rgbstock.com